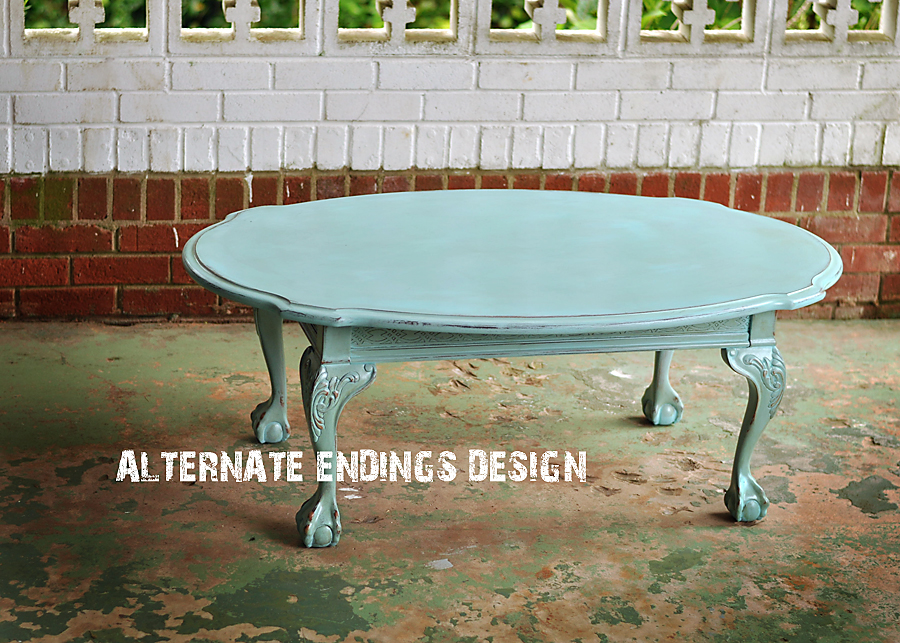
My family has been in overdrive the last two weeks. Even though we homeschool, we do so many activities outside the home during the school year. We have been in a rush to get all of our supplies, books, and LOTS of projects completed. I keep saying that things will calm down, but it will get worse before it gets better, lol!
Here are a few projects that we finished up and headed out today...
I was surprised when my hubby was thinking about swapping this table with our current coffee table. I mean, I totally LOVE it, but I am not quite ready to part with our ginormous, square, red hangout yet. Yes, I am a color addict and I won't be changing anytime soon. I hope my son finds a girl ready for some colorful walls because white walls don't exist here. :)
And check out these gorgeous feet...
Last, but not least, is a project that I have been waiting for the perfect table backdrop for. I love doing subway art wall boxes and wanted to try it on some tables. It needed to be a surface that was pretty plain so it would not overwhelm it. I found some honking wood storage tables that were perfect!
Then I wanted some rustic chunky hardware and found a match! I just love how they turned out!
Be sure to check out Alternate Endings Design on Facebook!
Showing posts with label upcycled. Show all posts
Tuesday, August 7, 2012
Monday, July 23, 2012
Keep on Keepin' on...
A bit more finished up today and hopefully I will be able to load it all up and get it outta here!
I have a tendency to keep things if they hang out too long. I have to put them to use, then I can't imagine not having them, lol. Maybe this is why my husband thinks I am a hoarder. :-/ The only way I can win that argument is if he sees a preview of the real "Hoarders". That's not good for anyone...
Oops! I kinda went on a detour there. Here is the rest of it...
I am linking up to these parties today. Check them out. :)
Take a Look Tuesday
Manic Monday Linky Party
Pink Hippo Party
A Marvelous Mess
I have a tendency to keep things if they hang out too long. I have to put them to use, then I can't imagine not having them, lol. Maybe this is why my husband thinks I am a hoarder. :-/ The only way I can win that argument is if he sees a preview of the real "Hoarders". That's not good for anyone...
Oops! I kinda went on a detour there. Here is the rest of it...
I am linking up to these parties today. Check them out. :)
Take a Look Tuesday
Manic Monday Linky Party
Pink Hippo Party
A Marvelous Mess
Sunday, July 22, 2012
A Little Catch-Up
Here are a few tables that I finished off. These will be heading to Vintage Jane this week. :)
I have been so sick (and tired!) and I am FINALLY regaining my strength and building my endurance back up. I am so thankful for feeling so well this weekend and I am even enjoying the bit of stiffness from my hard work the last few days.
Before I got sick, I had a TON of projects in various stages of incomplete. I was wiped out totally for a few weeks and I couldn't even fathom trying to do anything (but look at my to do list and want to run in the opposite direction!). But I finally got crackin' this weekend. I still have tons to do, but at least I am gaining some floor space now!
Be sure to "like" Alternate Endings Design on facebook to see even more as I finish up!
I am linking up to these awesome parties!
DIY Project Parade
![]() |
| aqua blue and bits of gold on a fantabulous rolling side table! |
I have been so sick (and tired!) and I am FINALLY regaining my strength and building my endurance back up. I am so thankful for feeling so well this weekend and I am even enjoying the bit of stiffness from my hard work the last few days.
![]() |
| solid wood drop leaf table w/ drawer & happy yellow/white chevon pattern! |
Before I got sick, I had a TON of projects in various stages of incomplete. I was wiped out totally for a few weeks and I couldn't even fathom trying to do anything (but look at my to do list and want to run in the opposite direction!). But I finally got crackin' this weekend. I still have tons to do, but at least I am gaining some floor space now!
![]() |
| vintage sewing table w/ dove gray base and chillin' blue topcoat... |
Be sure to "like" Alternate Endings Design on facebook to see even more as I finish up!
I am linking up to these awesome parties!
DIY Project Parade
Friday, March 16, 2012
A Touch of Spring Color...
Here is my second table that I finished last week...
I wanted something with a little bit of color. I didn't want to go to extreme because I wanted it to be able to morph into a room for a long time instead of a passing fad. This side table started off in a light oak finish. I painted a base coat of a light gray to blend with the finish. Then, I mixed up a light green color that had a little more blue for coolness to match the green of the season. Of course, I couldn't just stop there. I added the last coat in a warmer yellow green wash for contrast.
I did some moderate distressing to show all of the colors and added a couple of coats of wax for durability. I just LOVED the finished table. If I had a place for it, I would be keeping this! It looked great everywhere I put it. As a bedside table or end table, its colors were surprisingly versatile.
I have already hauled this table off for all the shoppers at Vintage Jane, but if you have a piece that you would like funked up a bit, just let me know!
I wanted something with a little bit of color. I didn't want to go to extreme because I wanted it to be able to morph into a room for a long time instead of a passing fad. This side table started off in a light oak finish. I painted a base coat of a light gray to blend with the finish. Then, I mixed up a light green color that had a little more blue for coolness to match the green of the season. Of course, I couldn't just stop there. I added the last coat in a warmer yellow green wash for contrast.
I did some moderate distressing to show all of the colors and added a couple of coats of wax for durability. I just LOVED the finished table. If I had a place for it, I would be keeping this! It looked great everywhere I put it. As a bedside table or end table, its colors were surprisingly versatile.
I have already hauled this table off for all the shoppers at Vintage Jane, but if you have a piece that you would like funked up a bit, just let me know!
Tuesday, March 13, 2012
Loving the Time Change and Weather!
I am so excited about the time change and the fabulous sneak peek at Spring weather! Of course, I am NOT excited about waking up in the dark morning hours, but hopefully it will be lighter soon. When the daylight hours are longer and the weather is calling me to come outside, I feel like I can conquer the world, or at least finish something.
I have been working away on so many projects lately that i haven't even had time to post them! Well, I may just have to spew out some photos this week so you can see that I really have been doing something. Maybe short and sweet will get me caught up. :)
I refinished a couple of side tables this week. Yay! It has been since last Spring that I have gotten to do a furniture project. It will be happening more often now.
This is a solid oak and sturdy side table, but it's a bit ho hum. You know I just like to FUNK something up!
This drop leaf table started off with a light oak finish. I painted on a light gray base coat, then added two coats of a matte black. These are moderately distressed to let the light gray and light oak contrast with the darker top coats. They were finished off with a couple coats of wax to help them stand the test of time.
I will try to post my second table tomorrow with some details. I started a new Facebook page just for my repurposed and upcycled projects. Check it out at Alternate Endings Design!
This table and more will be heading up to Vintage Jane in Kville tomorrow. If you are local, come find some treasures of your own. :)
Joined the party at:
- Craft Schooling Sunday at Creative Jewish Mom
I have been working away on so many projects lately that i haven't even had time to post them! Well, I may just have to spew out some photos this week so you can see that I really have been doing something. Maybe short and sweet will get me caught up. :)
I refinished a couple of side tables this week. Yay! It has been since last Spring that I have gotten to do a furniture project. It will be happening more often now.
This is a solid oak and sturdy side table, but it's a bit ho hum. You know I just like to FUNK something up!
This drop leaf table started off with a light oak finish. I painted on a light gray base coat, then added two coats of a matte black. These are moderately distressed to let the light gray and light oak contrast with the darker top coats. They were finished off with a couple coats of wax to help them stand the test of time.
I will try to post my second table tomorrow with some details. I started a new Facebook page just for my repurposed and upcycled projects. Check it out at Alternate Endings Design!
This table and more will be heading up to Vintage Jane in Kville tomorrow. If you are local, come find some treasures of your own. :)
Joined the party at:
- Craft Schooling Sunday at Creative Jewish Mom
Tuesday, February 1, 2011
From Drab to Fab - January Creative Challenge
So for my project with a $20 maximum, came in at $18.44. It was a lamp that someone had given us long ago. I had kept it in my basement for ages because I really disliked it (that's really an understatement). I had to buy a new lampshade because I couldn't find one at the thrift store that was the shape I wanted. I'm sure I could have scoured more, But I was still under $20 so I didn't sweat it. So here is what I started with.

Pretty bad, huh? Not to worry. The first thing I did was to give the metal a little rub down with a fine grade sand paper to give it some tooth, then gave it a couple of coats of a red spray primer that was made for metal.

After priming it, I left that to dry for a bit while a freehanded a simplified leaf shape in pencil on the new lampshade. Next, I used thick artist acrylic black paint to fill in the pencil sketch. This was a silk lampshade, so anything too wet will spread. I went back and painted a black border on the top and bottom to give it a bit more punch.

By now, the primer was dry and I gave the base a couple of coats of matte black spray paint.

I then took a copper patina glaze and drybrushed all of the edges and surfaces that would normally show wear, topped it with the new shade and called it a day!


I joined the party at:
DIY Project Party monthly contest
Creative Share Wednesday @ Trendy Treehouse
FFA Friday @ Sassy Sites
Frugal Friday @ The Shabby Nest
Just Something I Whipped Up @ The Girl Creative
The DIY Show Off Project Parade
Amaze Me Monday @ Dittle Dattle
Letting the Creative Tuesday Juices Flow
Restored It Wednesday @ Restore Interiors
Trash 2 Treasure Tuesday @ Sassy Sites

Pretty bad, huh? Not to worry. The first thing I did was to give the metal a little rub down with a fine grade sand paper to give it some tooth, then gave it a couple of coats of a red spray primer that was made for metal.

After priming it, I left that to dry for a bit while a freehanded a simplified leaf shape in pencil on the new lampshade. Next, I used thick artist acrylic black paint to fill in the pencil sketch. This was a silk lampshade, so anything too wet will spread. I went back and painted a black border on the top and bottom to give it a bit more punch.

By now, the primer was dry and I gave the base a couple of coats of matte black spray paint.

I then took a copper patina glaze and drybrushed all of the edges and surfaces that would normally show wear, topped it with the new shade and called it a day!


I joined the party at:
DIY Project Party monthly contest
Creative Share Wednesday @ Trendy Treehouse
FFA Friday @ Sassy Sites
Frugal Friday @ The Shabby Nest
Just Something I Whipped Up @ The Girl Creative
The DIY Show Off Project Parade
Amaze Me Monday @ Dittle Dattle
Letting the Creative Tuesday Juices Flow
Restored It Wednesday @ Restore Interiors
Trash 2 Treasure Tuesday @ Sassy Sites
Tuesday, January 11, 2011
January Creative Challenge!
Theme: Totally Drab to Totally Rad!
I know it sounds a bit 80s but don't let that influence you (or do, if that's your thing!). Here are the details of our first public challenge with From Art to Zebras. Above all, HAVE A BLAST!
Your challenge this month is to spend $20 or less at a thrift store and buy something super ugly, tacky or otherwise abominable and revamp it into something totally awesome. If you have something totally horrible already, first, let me say I'm sorry; second, why???; and third, go ahead and use it for the challenge. You must take pictures of the item in its original state, so we can see both the before and the after. Your purchase can be a piece of artwork, clothing, figurine, statue, platter, furniture -- whatever! You decide. You can purchase more than one item at the thrift store as long as your total is $20 or less, and your items somehow come together in the same theme of the project.
Rules:
- Craft your project during this challenge period (Jan 11 - Jan 31st 2011) only. Projects created before this timeframe will not be removed, but they will be excluded from the voting. Post before and after shots on our From Art to Zebras facebook page and tag yourself in them. If you don't have a facebook account, you can either get one, lol, or just email them to us and we will post them.
- You can make this by yourself or as a group or family. If participating as a group, please tag all individuals. You will be responsible for working out how the prize will be divided.
- Post your craft no later than Jan 31st.
- Voting will happen from Feb 1-8, 2011.
- Enter only ONE project. Your entry can have multiple components to it.
Originality:
It's probably impossible to know whether your project is 100% original or made by anyone else in the past. But if your project was definitely inspired by something you've seen before, please give credit to that project.
Prizes:
At the end, I'll set up a poll and the first place winner will get:
(1) their project featured on blog, facebook, website and twitter!
(2) bragging rights (you'll probably do it anyway).
(3) a $75 gift certificate to use with From Art to Zebras on anything! classes, camps, events, artwork, gifts, photography, okay, you get the hint. :)
Labels:
"Michelle K. Lyman",
challenge,
groups,
inspiration,
projects,
upcycled
Tuesday, March 30, 2010
Funky Little Toadstool Houses
The kids in our Draw/Paint/Sculpt class had so much fun designing and creating these little toadstool house. They used some old plastic bottles as the foundation and then added paper clay to create the houses. They started designing them on paper first and then painted away. These are SO cute and would make a wonderful little village.

Links to party with:
We Made It Friday
Links to party with:
We Made It Friday
Sunday, March 28, 2010
Handmade Mother Goose Stationery
If you know me, you will agree I like books. I love books. Okay, I may be considered a hoarder when it comes to books. Some of my books are no longer easy to read because of missing or damaged pages. I still can't part with them. Sometimes I will use them in my artwork to add a bit of whimsy.
I love upcycling and being able to use these books for an entirely different purpose. I used some of the pages from a Mother Goose book that were undamaged and handcut each envelope. These are so cute and have been very useful for quick thank you notes. I slipped some recycled colored cardstock into each one along with a matching address label with a star shape cutout.
I love these and can't wait to make more! You can get some of your own in our studio or check out our etsy shop, small fry notables.
Link parties to hang with:
Super Crafty Sundays
Check Me Out Saturdays
Metamorphasis Monday
Show & Tell Wednesday
It's a Hodgepodge Friday
Make It 4 Monday
Tots Tuesdays
Do It Yourself Day
It's So Very Renovated Tuesday
Show and Share Day
Toot Your Own Horn Tuesday
Nifty Thrifty Tuesdays
Making the World Cuter Monday
Talented Tuesday!
Creative Cats!
Trash to Treasure Tuesday
Penny Pincher Party Wednesdays
Lucky Linky Tuesday
Simply Designing Link Party
Made by You Mondays
Whatever Goes Wednesdays
Weekend Wrap Up Party
The DIY Show Off
Just Something I Whipped Up Monday
Made It Monday
Tip Junkie's Tip Me Tuesday
A Little Craft Therapy
Look What I Made
Whatever Goes Wednesday
Make It Yours Day
Get Your Craft On Thursday
Frugalicious Friday
I love upcycling and being able to use these books for an entirely different purpose. I used some of the pages from a Mother Goose book that were undamaged and handcut each envelope. These are so cute and have been very useful for quick thank you notes. I slipped some recycled colored cardstock into each one along with a matching address label with a star shape cutout.
I love these and can't wait to make more! You can get some of your own in our studio or check out our etsy shop, small fry notables.
Link parties to hang with:
Super Crafty Sundays
Check Me Out Saturdays
Metamorphasis Monday
Show & Tell Wednesday
It's a Hodgepodge Friday
Make It 4 Monday
Tots Tuesdays
Do It Yourself Day
It's So Very Renovated Tuesday
Show and Share Day
Toot Your Own Horn Tuesday
Nifty Thrifty Tuesdays
Making the World Cuter Monday
Talented Tuesday!
Creative Cats!
Trash to Treasure Tuesday
Penny Pincher Party Wednesdays
Lucky Linky Tuesday
Simply Designing Link Party
Made by You Mondays
Whatever Goes Wednesdays
Weekend Wrap Up Party
The DIY Show Off
Just Something I Whipped Up Monday
Made It Monday
Tip Junkie's Tip Me Tuesday
A Little Craft Therapy
Look What I Made
Whatever Goes Wednesday
Make It Yours Day
Get Your Craft On Thursday
Frugalicious Friday
Subscribe to:
Posts (Atom)